Since I'm featured in today's Bee article I thought I ought to repost some of my ice cream recipes. My strawberry rosewater is the one that got me interviewed and is also on the Allrecipes.com site. And please join my Facebook fan page and follow me on Twitter. Thank you!


Strawberry Rosewater Ice Cream.

Rosewater is most commonly used in Middle Eastern, West Asian, and South Asian pastries and sweets and is very distinctive in flavor. In this recipe, it is combined with strawberries to make a unique homemade ice cream. You can use other berries as well.
INGREDIENTS:
1 1/2 cups fresh strawberries,
hulled
1/3 cup white sugar
3 egg yolks, beaten
1/2 pint milk 1/4 teaspoon salt
1/3 cup white sugar
1 pint heavy cream
1/4 cup rosewater

DIRECTIONS:
1. Combine the strawberries and 1/3 cup sugar in a bowl; mash together with a potato masher. Store the mixture in the refrigerator while preparing the rest of the recipe.
2. Stir together the egg yolks, milk, salt and 1/3 cup sugar in a saucepan over medium heat. Heat to 175 degrees F (80 degrees C), making sure the mixture does not boil; transfer to a chilled bowl and move to the refrigerator to cool, stirring occasionally. Once cooled, stir in the cream, rosewater, and strawberry mixture.
3. Fill an ice cream maker with the mixture, and freeze according to the manufacturer's instructions.

Click here for mango pineapple sherbet and Meyer lemon cardamom ice cream.
Today is my final post from our Canning party last weekend. We are focusing on Ryan's recipes - red beans and rice and his beer can chicken.

I met Ryan about eight months ago at a Sacramento Tweetup. (That's a networking mixer for people who use Twitter.) Although he is a Northern California native, he's only turned into a true Sacramento area resident last year. He currently works at Voyage Home Loans and has a blog here. One of his prior locations was when he was working for DHL in New Orleans. While there he learned that true red beans and rice has to be made with pickled pork.

Now I like red beans and rice, but my only experience with it has been at Popeye's Fried Chicken and from the prepackaged seasoning packets you get at the grocery store. So this news about pickled pork was new to me and I just had to try it. After months of pestering, we finally got him to make a batch for us. Since my kitchen was occupied with canning and it was hot outside, I decided we would need to BBQ our meat and decided his other recipe, beer can chicken, was the perfect solution.


It turns out that pickled pork needs to pickle for three days to two weeks. Ryan got a batch started at the beginning of June so that we had a really pickled batch for the RB&R. It was already chunked out for the pickling, and here he is just giving it a final trim and cut before adding it to the pot of beans and seasonings.


His girlfriend, Lisa, mixes the beans. We cooked them on a separate burner since the stove was occupied with canning.


The spices are applied to the chickens and then they were 'violated' with beer cans stuck inside their cavities. Each beer can is half full otherwise it would boil over.


Our chickens were big and so we did take them off the grill a little too early and they were a bit underdone. The joke was that he was fixing us chicken sashimi. As you can see, it looks a little uncomfortable with a beer can up your rear.


The beans are ready. The rice is cooked separately and dished out and then you ladle the beans on top. Extra hot sauce was provided on the side in case you wanted to make it even hotter.


My plate of chicken and the red beans and rice. So good! Thank you, Ryan, for sharing!

And here are the recipes:

Ryan’s Rad Red Beans and Rice
(alliteration always is acceptable!)

* 2 tablespoons vegetable oil
* 3 stalks celery, chopped
* 1 medium onion, chopped
* 2 medium green bell peppers, chopped
* 2 teaspoons salt (Kosher if you have it)
* 1 teaspoon ground black pepper
* 1 teaspoon cayenne pepper
* 5 cloves garlic, minced fine
* 1 lb pickled pork, cut into 1-inch pieces
* 1 1/2 teaspoon dried thyme
* 3 bay leaves
* 2-3 teaspoon hot sauce
* 2 quarts water
* 1 pound red kidney beans, rinsed (also look for non-beany material)

For rice:

* Some type of long-grain rice (I prefer brown)

Place the vegetable oil in a 7-quart pot oven and set heat to medium-high. Add the bell pepper, onion, celery, salt and pepper to the pot. Cook and stir often, until the onions and celery are somewhat translucent and the bell peppers are fork tender, (usually about 7 or 8 minutes). Add the garlic and cook for 2 minutes, stirring constantly to avoid burning.

Add the pork, thyme, bay leaves, hot sauce, cayenne pepper, water and beans to the pot. Turn up the heat to high. Cook while stirring frequently until it comes to a boil.

Decrease the heat to maintain a simmer, cover and cook for 1 1/2 hours. Stir the mixture every 30 minutes.

Uncover and increase the heat slightly to maintain a steady simmer. Continue to cook for another 30 to 60 minutes, or until the beans are tender and you like the thickness. You can make it creamier in texture by mashing up some of the beans with a fork. You can also use a masher, but that squishes too many of the beans.

Prepare rice during the last 30 minutes of cooking however you prefer to prepare rice. I like to use a cooker, but however you like is fine.

Pickled Pork:

* 2 cups water
* 1 cup apple cider vinegar
* 1/4 cup salt (preferably Kosher)
* 8 cloves garlic, peeled and crushed
* 2 tablespoons yellow mustard seed
* 3 tablespoons hot sauce (less if you’re not into spicy)
* 3 tablespoons sugar
* 1 tablespoon celery seed
* 1 bay leaf
* 1 teaspoon whole black peppercorns
* 8 -10 ounces ice
* 1 1/2 – 2 pounds fresh boneless pork butt, cut into 2-inch cubes

Put all of the ingredients (except the ice and pork) in a 2-quart saucepan, set over high heat and bring to a boil. Saucepan should be stainless. Reduce the heat and simmer for 3-4 minutes. Remove saucepan from heat, add stir in the ice. Put the pork and the cooled pickling liquid into a 1-gallon ziplock bag. Squish out as much air as possible; seal the bag and place in the refrigerator for minimum of 3 days. Jostle the bag around, carefully, once a day. You can pickle for up to 2 weeks. Remove from the brine and use the pork, or freeze in the bag.

Ryan’s Spicy Beer Can Chicken:

1 Whole Roaster Chicken (about 4#)
1-2 TBS of Vegetable Oil (Enough to cover the chicken)
2 TBS Salt
1 tsp Black Pepper
½ tsp White Pepper
1 tsp Paprika
¼ tsp garlic powder
½ tsp chipotle powder
¼ tsp cayenne pepper
½ tsp rosemary (minced if fresh, ¼ tsp if dry, but also minced)
1 can of beer (my preference is a high quality pale ale, poured from a bottle into a can, but any can of beer will do)

Clean the chicken and remove neck and giblets if necessary. Rinse the chicken inside and out and pat dry gently, but thoroughly with paper towels.

Mix the spices together completely.

Rub the chicken with the oil (lightly) inside and out, then rub the whole chicken inside and outside liberally with the spice rub.

Open the can of beer and take a couple of gulps to decrease the volume of liquid by about half. If refilling a can with a bottle of beer, only fill half way.

Put the can on a solid surface. Take the chicken, 1 leg in each hand, and place the cavity of the bird over the can of beer. The can should be physically inside the cavity of the bird.

Place the can and chicken on the center of the grill grates balancing the chicken on its 2 legs. It should be like a tripod on the grill.

Cook the bird over medium high, INDIRECT heat. This means that there should be no coals or lit burner (if on propane) directly underneath the bird. Cook for 1 hour and 15 mins with the grill cover on. If you have a thermometer the breast temperature should be 165 F and 180 F in the thigh area. You can also check if the thigh to see if the juices run clear when you pierce it with a sharp knife.

Remove from the grill and let rest for at least 10 minutes. Carve and enjoy.

The June 2010 Daring Bakers’ challenge was hosted by Dawn of Doable and Delicious. Dawn challenged the Daring Bakers’ to make Chocolate Pavlovas and Chocolate Mascarpone Mousse. The challenge recipe is based on a recipe from the book Chocolate Epiphany by Francois Payard.

My problem with this challenge was that they wanted it in chocolate. Thing is, I'm really kinda picky when it comes to chocolate. I love it, but only certain ways. For instance, I love chocolate candy and cake, but don't like it as ice cream, pudding, or mousse (this last I'll eat if I have to LOL). So I did mine without the chocolate.

Pavlovas are named after a Russian ballerina named Anna Pavlova. They are essentially meringue topped with cream and fruit. There is controversy between Australia and New Zealand as to where it was created, but research seems to indicate New Zealand (which my Kiwi friend is very proud of).

There are two styles of pavlovas. This challenge was presented as individual serving size. The pavlovas were therefore very crispy. The traditional style is to make it as a giant, cake sized meringue. Apparently in that version the outside shell is nice and crispy but the inside is marshmallowy soft. This sounds very interesting to me and so I will probably try that version next weekend for July 4th.


Meringue is simply egg whites and sugar beaten to very stiff. I took this mixture and used a decorator bag and tip to squeeze out the circle shells. I tried to create a bit of a lip on them to hold the toppings.

The challenge had a mascarpone mousse and a mascarpone cream. Talk about fattening! I made both and had a couple of issues. The mascarpone mousse came out perfectly except that there was no sweetness to it and so it was kind of drab. Perhaps if I had done the chocolate version it would have had the sweetness. Next time I would add a bit of sugar. But keep in mind that when combined with all the other elements (meringue, cream, fruit) there was plenty of sweetness.

The cream starts with a creme anglaise. My problem here is that I guess I overcooked it because the cream curdled. So I just forced it through a fine sieve over and over to cream it out again before I added the mascarpone.

At our party I decided to add some of our lemon curd as well. So the layers went: meringue shell, lemon curd, mascarpone mousse, fruit (plum/nectarine), and mascarpone cream on top. Everyone loved it, although Paul thought there were too many elements. I can't wait to try the other version.


Meringue shells

3 large egg whites
½ cup plus 1 tbsp (110 grams) white granulated sugar

Place a rack in the center of the oven and preheat to 200º F (95º C) degrees. Line two baking sheets with silpat or parchment and set aside.
Put the egg whites in a bowl and whip until soft peaks form. Increase speed to high and gradually add granulated sugar about 1 tbsp at a time until stiff peaks form. (The whites should be firm but moist.)
Fill pastry bag and pipe meringue onto parchment in whatever shape desired.
Bake in oven for 2-3 hours until the shells are crispy.
Store in an air-tight container for up to three days.

Mascarpone Mousse (for the top of the Pavlova base):

1 ½ cups (355 mls) heavy cream (cream with a milk fat content of between 36 and 40 percent)
grated zest of 1 average sized lemon
1 2/3 cups (390 mls) mascarpone
pinch of nutmeg
2 tbsp (30 mls) Grand Marnier (or orange juice)

1. Put ½ cup (120 mls) of the heavy cream and the lemon zest in a saucepan over medium high heat. Transfer the mixture to a bowl and let sit at room temperature until cool.
2. Place the mascarpone, the remaining cup of cream and nutmeg in a bowl. Whip on low for a minute until the mascarpone is loose. Add the Grand Marnier and whip on medium speed until it holds soft peaks. (DO NOT OVERBEAT AS THE MASCARPONE WILL BREAK.)

Crème Anglaise (a component of the Mascarpone Cream below):

1 cup (235 mls) whole milk
1 cup (235 mls) heavy cream
1 vanilla bean, split or 1 tsp pure vanilla extract
6 large egg yolks
6 tbsp (75 grams) sugar

1. In a bowl, whisk together the egg yolks and sugar until the mixture turns pale yellow.
2. Combine the milk, cream and vanilla in a saucepan over medium high heat, bringing the mixture to a boil. Take off the heat.
3. Pour about ½ cup of the hot liquid into the yolk mixture, whisking constantly to keep from making scrambled eggs. Pour the yolk mixture into the pan with the remaining cream mixture and put the heat back on medium. Stir constantly with a wooden spoon until the mixture thickens enough to lightly coat the back of a wooden spoon. DO NOT OVERCOOK.
4. Remove the mixture from the heat and strain it through a fine mesh sieve into a bowl.

Mascarpone Cream (for drizzling):

1 recipe crème anglaise
½ cup (120 mls) mascarpone
2 tbsp (30 mls) Sambucca (optional)
½ cup (120 mls) heavy cream

1. Prepare the crème anglaise. Slowly whisk in the mascarpone and the Sambucca and let the mixture cool. Put the cream in a bowl and beat with electric mixer until very soft peaks are formed. Fold the cream into the mascarpone mixture.

Plum jam, spicy mint jelly, and FF onion marmalade

What an exhausting and hot day we had. But the fruits of our labor were worth it. I held a canning party yesterday and the kitchen was in use for over six hours.

It started because Poor Girl Kimberly and I had been pestering our friend, Ryan (Voyage Home Loans), for months. He lived in New Orleans and had learned how to make red beans and rice the right way - with pickled pork. Kimberly wanted to blog about it from a Poor Girl cost savings point of view and I just wanted to try it and blog it as well.

My other friend, Karen, had said she wanted to have a canning day. I figured, why not put the two ideas together? We would do a variety of canning, Ryan would make his dish, I'd do my Daring Bakers' Challenge for June, and we would all feast at the end of the day. Then everyone would go home with a variety of jars in trade. Ryan's girlfriend, Lisa, joined us as well as our most ambitious contributor, Epicurean Paul.


The lemon curd station was in the dining room since we were using the microwave.

By the end of the day we had lemon curd, plum jam, FF onion marmalade, and spicy mint jelly. For dinner, red beans and rice, beer can chicken, and green salad. We ended the night with pavlovas with mascarpone mousse, fruit, mascarpone creme anglaise, and homemade vanilla ice cream.


There's so much that I'm going to do a couple of blog posts. This will be on canning, one will be Ryan's recipes, and one will be the Daring Bakers post for June.


The first shift was Karen making plum jam and Kimberly worked on my microwave lemon curd. Both of these were done in about an hour.


Poor Paul. He chose the FF onion marmalade. He nicknamed it with F'n Forever because it took forever to cook and then you have to let it set for two weeks. Each batch took over two hours to do. What was amazing was that almost 20 pounds of onions only created six pint jars. And boy did those onions torture us! I have a small bungalow. While Paul was busy slicing all those onions, the onion fumes drifted through the house so that we all suffered. Lisa was practically in tears and sitting the farthest possible distance, on my living room sofa. Even my cats were dying. They came out of the bedroom with squinty, blinking eyes going, "what are you doing!?"


After four hours of onions, there was still the spicy mint jelly to make.


Kimberly and I chopped up about four cups worth of mint leaves since we were making a double batch. Paul got a variety of peppers and not just jalapeno. Luckily this one only took an hour to do.

The day was definitely fun, but long. And there was a lot of waiting between phases, except for Paul's forever onions. We all agreed on a few things. First, it would be nice to have a pool to sit and chill by for all this waiting on a hot day. Next, canning is not the easiest thing to do on a hot summer day. But mostly we learned that canning can be fun and if you do a canning party, you can get a great variety to match the variety of your friends.
Nationwide Meats on Urbanspoon
Don't you hate it when something gets a lot of hoopla and then you don't like it yourself? Or you think, "What's so special about that?" Such is the case with Nationwide Freezer Meats and their burger.

Now before I continue I should say that burgers, like pizzas and ribs, are very personal dishes in that people like things their way. NWFM has a lot of devoted Sacramento fans and lots of good reviews by others and on Yelp. So go ahead and judge for yourself.

I've heard of NWFM for many years but never could seem to locate it. (Not that I was looking very hard in the first place.) Then on a recent meeting at The Urban Hive I noticed that they were right across the street. I made a mental note that I finally would have to venture over. That day was today, sans camera.

The place itself is on the corner in a duplexy commercial building. Inside it is bright, clean, and very spacious. They could pack more tables in if they wanted to. I think it appeared so spacious today because tables had been pushed together for a large party. The counter is way toward the back.

I asked for a combo order of their French Ground Steak Burger with fries and soda. My order was written on a paper bag. There are no plates, trays or baskets here to worry about washing. Talk about a minimilistic approach, forget the salt shakers, on the tables are set the big round containers of iodized salt. And to the side there are bottles of mustard and special sauce, but no ketchup. I began to worry until my order came out with a small dental spit cup filled with ketchup.

The burger is made with Harris Ranch beef, ground on site, then hand shaped into patties. Considering this, I was really disappointed. I found the meat dry, tasteless, and overcooked. The patties were large because they had been pressed flat and thin. Therefore, it seemed that they had squeezed and cooked the taste out of it. What I did taste was salt. There was a definite saltiness upon first bite. I can also see the appeal of ordering a double-burger to get more meat per bite considering the thinness of the patty. The bun was good, though. It was able to stand up to the burger and toppings while not falling apart.

The fries were disappointing as well. Expect potatoes that have been cut lengthwise into thick, one-inch sticks with skin left on. Sure, they are hefty suckers, but not all that appetizing. I left more than half of them behind.

For those of you who love Nationwide, so be it. You can have my servings while I go elsewhere.

A few years ago I went on a vacation to Puerto Vallarta where we went on the obligatory tour of a tequila factory. They had a variety of tequilas including a coffee flavored one. They said it could be used in cooking and since I like to add alcohol to my cakes, I bought a bottle.


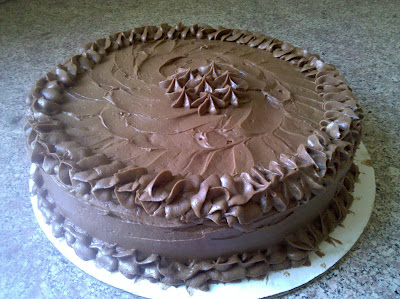
I've hardly used it at all. I tried making brownies with it like I do with the kahlua. Didn't care for it much. This weekend I had a party and had made the pina colada cupcakes and decided to supply a chocolate alternative. I opted for a layer cake this time since I didn't want to do another set of cupcakes.

This time I think it worked well. There is definitely the flavor of tequila in this cake if eaten straight, but with the cocoa frosting, it is muted.

You can use a different alcohol such as rum, kahlua, or amaretto.


Chocolate Cake w/ Coffee Tequila

2 c flour
2 c sugar
1 t salt
1 t baking soda
1/2 t baking powder
1/3 c cocoa powder
1/2 c shortening
2 eggs
1 t vanilla
1/2 c water
1/2 c buttermilk
1/2 c coffee tequila
2 oz melted unsweetened chocolate

Heat oven to 350 degrees. Grease and flour two round cake pans. Line the bottoms with circles of parchment paper.

Mix the dry ingredients together in a medium bowl. In a large bowl, cream together the eggs and shortening. Add eggs and vanilla and blend together. Gradually add dry ingredients and mix until well blended. Add water, buttermilk, tequila, and melted chocolate. Mix well. Pour half the batter into each of the cake pans. Bake 20-25 minutes or until pick comes out clean. Remove from oven and cool.

Cocoa Frosting

1/2 c softened butter
1/3 c cocoa powder
3 c powdered sugar
2-4 T milk

Cream together butter and cocoa. Blend in powdered sugar. Gradually add milk until the mixture comes to a spreadable frosting.


Tequila


Cocoa Powder

With all the cupcake tasting I've done lately, I have had a desire for flavor combinations. I was invited to a BBQ and offered to bring the dessert. Here was my chance to make the pina colada cupcakes I've been dreaming of for a while.

I wanted to make these with a coconut cake and a pineapple frosting. I purposely wanted the separation of the flavors in the two elements that would then come together.

As an added bonus, I used rum. Alcohol in baked goods keeps them nice and moist. Have you had a rum or kahlua fudge cake? I also brushed the finished cupcakes with rum before I frosted them. If kids are around you can make some without. In the picture the green are for kids and the red for the adults. You can brush them once or twice, depending on how much rum you want to soak in. I did twice and think next time I'll even do a third.

I had wanted to do a decorator tip piping of the frosting, but the chunks of crushed pineapple clogged the tip. I ended up just spreading the frosting on.

Coconut cake

* 3 cups sifted flour
* 4 teaspoons baking powder
* 1/2 teaspoon salt
* 1/2 cup shortening
* 1/2 cup butter
* 2 cups sugar, divided
* 1 1/3 cups coconut milk
* 1 teaspoon vanilla
* 1/3 cup shredded coconut
* 5 egg whites

Cream shortening and butter with 1 1/3 cups of the sugar. In a small bowl, combine flour, salt, and baking powder. Add sifted flour alternately with coconut milk, beginning and ending with flour; add vanilla. If desired, add 1/3 cup fresh coconut to the batter. Blend in the 1/2 cup of rum. In a separate bowl, beat the egg whites, gradually adding the remaining 2/3 cup sugar, to soft peaks stage. Fold egg whites into cake batter, just enough to incorporate. Scoop batter into lined cupcake pans, filling to 3/4 full. Bake in a preheated 350° oven for 25 minutes, or until cupcakes bounce back when touched lightly.

After the cupcakes come out of the oven, brush them with more rum. When they are completely cooled, frost with pineapple frosting.

Pineapple Frosting

1/2 cup butter
4 cups sifted confectioners' sugar
6 tablespoons well drained crushed pineapple
1 to 2 tablespoons pineapple juice

Cream butter; gradually beat in sugar, creaming well. Stir in crushed pineapple and just enough pineapple juice to make it spreadable. Beat to blend thoroughly.


Coconut Milk


Pineapple


This weekend I was Best Woman at a wedding - my father's. My dad, Peter, is 77. His new wife, Betty, is 75. You watch them, though, and you see young love.

Betty's husband and my mother died about the same time, three years ago, both after long illnesses. In the case of my family, it had been a difficult 3.5 years watching mom totally incapacitated by her massive stroke. My dad went to visit her almost every day during that time. So those 3.5 years and the last three have been hard and lonely for him. I am happy he's found someone.

Betty and dad met via the internet! They met via some kind of seniors Match.com site. I'll have to ask them the exact one so I can link it. They immediately felt a connection and their courting phase was short. Dad says they don't have time to waste. At least it gives my 45 year old self some hope.


They decided on a quick casino wedding in Reno to keep down on any over-celebrating by friends and family. I guess they kind of eloped. LOL. I was there due to my close proxity to Reno and Betty's granddaughter and her family came as well. While we were watching one of the acts at Circus Circus I caught this shot of them. This was something I never saw with mom. Not that that's bad. Every relationship is different and also time often subdues or curtails such public displays of affection. It was just kind of cute and sweet to witness from them.


I like Betty very much and her granddaughter's family also shows that this is good people. I can only hope, as any daddy's girl would, that my dad has many years of happiness to share with Betty this twilight of his life.

There's a comfort to the simplicity and yet versatility of shortcakes. The simplicity comes from the fact that they are a simple sweetened biscuit. But they are so versatile because they can be used with any fruit. Don't limit yourself to strawberries. You can use whatever fruit is in season or you have on hand. I'll even just eat them plain, like a scone (its very close sibling) with lemon curd.

Finding the perfect recipe for anything you really love can be hard. You try ones from magazines, cookbooks, and websites. Luckily I've found a great one in Dorie Greenspan's From My Home to Yours. Due do copyrights, I can't give it to you here. I can only tell you that this cookbook has plenty of A1 recipes and this is one.

An interesting difference in this recipe is that it doesn't call for putting or rolling the dough into an inch thick slab and then cookie cutting out the round biscuits. This recipe has the dough more clumpy and just dropping clumps like cookie dough onto the baking sheet. This creates a bumpy, lumpy biscuit that will crumble more easily because it's a bit more delicate than other recipes. So don't expect to split the shortcakes in half to fill them with cream and fruit.

I get my love of true whipped cream from my British dad. For these I decided to make a lemon curd whipped cream. This means folding in a bit of lemon curd into the whipped cream so that it has a light lemon flavor.

But if you use real whipped cream you have to worry about it weeping as it sits. It will fall apart over time. How do you stabilize it so it will keep for hours or even days? I use the gelatin method. So below in the recipe I'll describe my steps for making a lemon curd whipped cream that will hold up. Here is the link to my microwave lemon curd.

Lemon curd whipped cream

1 c heavy whipping cream
2 T sugar
1/4 lemon curd
3 T hot water
2 t powdered gelatin

In a small bowl, place the hot water and powdered gelatin. Stir it well and then set it aside to cool for about five minutes.

In a medium bowl whip the heavy cream with an electric beater at high speed. Gradually add the 1-2 tablespoons of sugar. Remember that you will get a lot of sweetness later from the lemon curd, so you may decide to go on the low side. Whip the cream to soft peaks. Gradually add in the liquid gelatin as you continue to beat to stiff peaks.

Gently fold in the lemon curd until fully incorporated.
Icing on the Cupcake on Urbanspoon
Icing on the Cupcake
Recently I've been doing a lot of cupcake tasting. It's not that I really like cupcakes, but that I became aware of some new cupcake shops and wanted to do some comparisons. Here is a quick link to my other reviews for Esther's Cupcakes (my current favorite) and for Let Them Eat Cake in Davis. Today's store: Icing on the Cupcake in Rocklin.

As I said in the Esther's review, it's a little late in the game or food trend curve to be doing cupcakes. It's not even 2009, it's more like 2007-8. For how far Sacramento has come on the dining scene, are we so behind on the dessert and food trend scene? The answer is YES!!! If you regularly read my blog you know of my bitching on the lack of dessert places and our stupid city ordinances that are deterring the great prospects of gourmet food trucks. SIGH! But if we must suffer with the lack of dessert eateries, at least a tiny portion of that is being taken care of with cupcakes. The only thing is, they aren't the late night, dessert date spot that I keep praying for.

I must make do.

But today we are talking about Icing on the Cupcake. The reason I even heard of it was through people comparing Esther's to IotC on Yelp. Although I see Yelp's place in the internet world, I generally steer clear of it as being just TOO open for just anyone to comment. You know how it is on any open commenting site, you get haters out there that just slam things mean spiritedly and that just annoys me. (And before you go comparing me to them, this is MY blog and I can say what I want on my own pages.)

I digress.

Since I was heading out to Placer County for a Tweetup event, I figured I might as well stop in and pick up some cupcakes from this latest contender. I found the shop in old Rocklin on Pacific Street. You can't miss the store with it's large cupcake logo sign and the candy striping of their pink and brown colors. This was the largest store of the ones I've visited, with seating both inside and in a nice covered patio outside. Inside the store were two display cases and a small counter.


IotC changes their flavors by a weekly schedule. I had looked up Tuesday on their website and knew I was going to get the pistachio and the June special of raspberry lemonade. Because I wanted the special flavors, I called ahead and left a message asking them to save them for me. I didn't want them to run out and I'd be left with boring chocolate and red velvet. They were very good in calling me back to let me know they did and they looked forward to my visit. Once I got there I also added an orange cupcake to my order. I liked that the packaging here was in the nice cardboard cupcake boxes similar to Esther's. Note that if you come back with the box (recycling effort) you will get a free cupcake. That's a great deal. Don't you wish more bakeries offered that!?


I went home and split all of them in half so I could share them with my friend (and justify getting three!).

The cakes themselves were nice, moist, and had a good crumb. I was also happy to see them rising high out of the cupcake paper so that I wasn't being cheated of cake. Two of the three had good flavor too. After all, there should be flavor in both the cake and the icing. The pistachio and the orange did taste like their namesakes.

I was disappointed in the lemon cake of the raspberry lemonade cupcake. Perhaps it lacked flavor in the cake because you were getting an extra sugar punch with the embedded bit of raspberry filling. I'm finding that I'm not a big fan of injected fillings in my cupcakes. It could be because I'm an icing scraper. I go for center cut pieces of cake and even scrape the icing off those. So having an extra sugar shot in the cupcake and then the mound of icing on top is just too much for me. (Exception to this - melty chocolate or cream cheese in black bottom cupcakes.) Anyway, the lemon wasn't too strong in this cake, it all came in the icing.

Let's talk about icing. Buttercream, to be specific. Buttercream in basic form is butter creamed with powdered sugar, although other fats can be used. This seems like cheating to me because buttercream ought to have BUTTER only. Unfortunately, many buttercreams are made with margarine or even Crisco. Yuck! I'm a purist. Give me butter. And there is the number one reason Esther's is still winning my heart - their buttercream is buttery!

IotC's buttercream is supposedly made with butter as well, but it is nowhere near as buttery. I think the difference is what kind of buttercream they are doing. Esther's, I believe, is doing a French cooked buttercream which is considerably richer due to the eggs. IotC's icings were flavorful in terms of orange, pistachio, and lemon. And they were full of sugar - definitely sweet, but still a grainier, less rich, less soft buttercream. Then again, Cakegrrl (who obviously works a lot with cakes) made a valid point that in terms of catering, buttercreams are just going to melt and lose shape. So you need to have an icing that will stand up to time and temperatures if you are going to have them out for a while, like at a wedding or a party. Touché.

At this point I can say that all three cupcake stores have great products and are WAY better than Cupcake Craving, which I refuse to even comment more on except to say that they use MIXES, and some others. It's been a while since I've been to Babycakes, so I guess I'll just have to re-taste them (haha). Luckily there is no real competition between the three because they are so far from each other: Davis, Rocklin, Sacramento. Esther's is still my fave, but I would certainly be happy to check in to the others when in the vicinity to see what cool flavor combos they have that day.

This weekend was the Sunset Magazine Celebration in Menlo Park. Each year Sunset Magazine holds a kind of open house on their campus. The public is invited in to see their test kitchens and gardens and to visit with some of their favorite product vendors and get ideas.

This celebration weekend is one of those things that myself and my carpoolers had wanted to go to before, but had never gotten around to. After all, for us Sacramentans, it is a bit of a trip. You either have to have a burning urge, friends who also want to go, and best to have both. This year there were a couple of other Meetup members who wanted to go and so we set off at 7:30 with the thought of getting there when it opened and hopefully beat the crowds.

We arrived right around the 10 a.m. opening time and were able to find free parking on the street a couple of blocks away. Tammy had joined Sunset's wine club and one of the perks was free admission tickets for two. Niefia and I bought another ticket and split the cost. The wine club membership allowed them to get free glasses and entry to a VIP section which was nice and air conditioned. We needed that later in the day.

The headquarters is located over several acres in few single story buildings. No high rises here, which is comforting considering the Sunset mystique. Throughout the campus were booths, stages, and vendors galore.

I hadn't known what to expect and I will tell you - I had a great day. The place was, of course, packed. We were given reusable shopping bags upon entry and immediately got into a line for free samples. In a 50 foot stretch were about twenty vendors with samples of sorbets, teas, sauces, chocolates, and more. The line crawled and so after getting a chocolate fix we moved on to see the test kitchens.


They have one large kitchen with four cooking sections. Each section has different appliances that are typical to those found in household kitchens. After all, they want us all to be able to replicate the recipes that they provide with the same equipment. That's why one kitchen is gas oriented, another electric, there's one with grills, another with a convection oven, etc. Each recipe gets prepared at least four times and sometimes as much as a year in advance. It's the beginning of June and they had just finished testing Thanksgiving recipes.

Later we walked through their garden area, They had some interesting growing products that I wanted to look into, including Wooly Pocket planters and Plants on Walls, both for growing plans on your walls. I also saw potato towers which I'd like to try next year. In a two foot square area you can grow a mess of potatoes vertically in a cage structure.


There were also a couple of hands-on areas that were good for kids. One area you could paint a ceramic pot and in another area you could string together Hawaiian leis.

We never had to buy anything to eat or drink because there were plenty of items to sample. There were great products to view and every county in California and some places in Oregon and Nevada had booths trying to get you to visit.

I enjoyed myself and think I will go again next year. The lesson we learned for next time, go first thing to sign up for any seminars you want because they sell out right away.


This year I started canning. It was something that I had never grown up with. I had the distorted impression that canning was difficult, required a lot of equipment, and made huge amounts. How wrong I was. Not only is it easy, you only need a pressure cooker for certain things (of which I've not done any of those yet anyway), and you can make a small batch of only one pint if you really want to.

And so we have created a canning freak. The funny thing is, I'm not a big jam/preserve person, and so I'm not sure what I'll do with this stuff besides give it away. I'm having fun though - experimenting and playing around.

Here are a couple of my simple shortcuts.

I estimate the number of jars I need, fill them with water, and then nuke them in the microwave. I figure if you need to sanitize your jars, why not nuke them?

I heat the lids in a small saucepan of water. After I've ladled and sealed the jar lids on the jars, I take all that hot water I had used for sanitizing and transfer it to a pot of water to cover my jars and boil/seal for ten minutes. Don't want to waste water.

So far I have made my spicy strawberry jam, citrus marmalades, lemon curd, and below, my balsamic cherry jam.


The last one was an example of small batch jam making. I had bought some cherries at the farmers market that seemed good when I tasted there, but then when I got home I realized the batch wasn't that flavorful. I figured this was perfect canning fruit.

Balsamic Cherry Jam


1 lb of cherries, pitted, halved
1 c sugar
1/4 c balsamic vinegar
1/2 pkg of pectin
cinnamon stick
1/4 t nutmeg

Place all ingredients into a saucepan and bring to a boil. Continue stirring until the mixture boils down to a thick consistency. Jar and seal.


Repost with recipe added

I only like fresh lychees, not canned. Today I saw my first batch of fresh lychees at the Asian store near me. I bought a bag. I liken lychees to peeled grapes. They have the same juicy consistency, but with a harder protective skin. Some people have never seen a fresh lychee or know what to do with them, so here are pictures of me peeling one.


The skin is bumpy, but thin. Under the coarse skin is a thin, membranous skin that holds the juices in.


The pit has to be eaten around. It's not like a peach stone, which you can usually just pull out.

Lychees are used in sauces, drinks, salads, etc. You can find some recipes here.


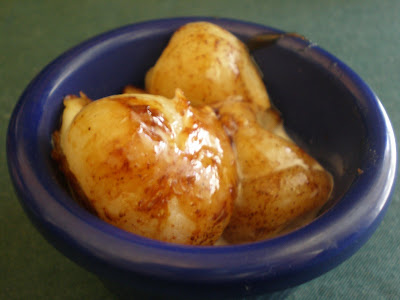
Caramelized Lychees


These are great for putting over ice cream.

1 lb lychee fruit, peeled & seeded
½ cup brown sugar
4 tablespoons butter
2 teaspoons ground cinnamon

In a skillet melt the butter over medium low heat. Add sugar, cinnamon, and lychees. Cook until sauce is nice and caramelized and the lychees are lightly cooked, about five minutes. Serve over ice cream.


Fresh Lychee