Daring Bakers: Coconut Cream Panna Cotta

  
The February 2011 Daring Bakers’ challenge was hosted by Mallory from A Sofa in the Kitchen. She chose to challenge everyone to make Panna Cotta from a Giada De Laurentiis recipe and Nestle Florentine Cookies. This post focuses on the panna cotta. My other post focuses on the florentines.

I had already made my first panna cotta last year (see here) and so that part of this month's challenge was not new for me. But because I have to host a Mai Pham, Vietnamese style dinner next month, I chose to make a coconut cream panna cotta to see if it would work. It turned out fabulous, much better than I expected.  What took it over the top was because I used a blackberry honey that I bought last summer at the farmers market. Giada's recipe uses mostly honey to sweeten the panna cotta, versus the recipe I used last year that used only sugar. Both recipes are good in their own rights. 

One of my criteria for a good panna cotta is that it has a beautiful jiggle to it. This recipe did. For an example, see the video at the bottom of my Grange review here

This recipe is the Giada one adapted to use coconut cream. You will find coconut cream in Asian markets. It is much thicker than coconut milk, having the high fat content that you want for panna cotta.

Coconut Cream Panna Cotta 

1 cup whole milk
1 tablespoon (one packet) unflavored powdered gelatin
1 cup  whipping cream
2 cups coconut cream
1/3 cup honey
1 tablespoon granulated sugar
pinch of salt
  1. Pour the milk into a bowl or pot and sprinkle gelatin evenly and thinly over the milk (make sure the bowl/pot is cold by placing the bowl/pot in the refrigerator for a few minutes before you start making the Panna Cotta). Let stand for 5 minutes to soften the gelatin.
  2. Pour the milk into the saucepan/pot and place over medium heat on the stove. Heat this mixture until it is hot, but not boiling, about five minutes. (I whisk it a few times at this stage).
  3. Next, add the cream, honey, sugar, and pinch of salt. Making sure the mixture doesn't boil, continue to heat and stir occasionally until the sugar and honey have dissolved 5-7 minutes.
  4. Remove from heat, allow it to sit for a few minutes to cool slightly. Then pour into the glass or ramekin.
  5. Refrigerate at least 6 hours or overnight. Serve from ramekins or turn out on plates, To turn out, run a knife around the edge of the panna cotta. Place a hot rag around the ramekin for a few seconds and then flip the ramekin onto a plate to release the panna cotta. Add garnishes and serve.


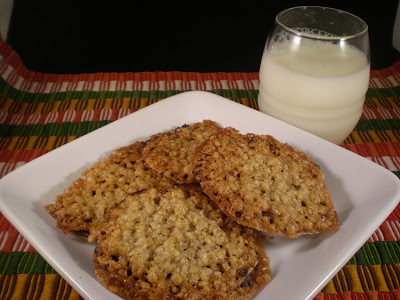
The February 2011 Daring Bakers’ challenge was hosted by Mallory from A Sofa in the Kitchen. She chose to challenge everyone to make Panna Cotta from a Giada De Laurentiis recipe and Nestle Florentine Cookies. This post focuses on the Florentines. My other post focuses on the panna cotta.

Florentines originated in Florence, Italy. My first exposure to them was the ones you find at Trader Joe's. Most recipes call for minced nuts in the caramelized sugar mixture, but this one calls for quick oats. Both taste the same since it is the caramelized sugar that is the real flavor.

This couldn't be an easier cookie to make. The most 'difficult' part would be to watch the oven to make sure you get them just the right color/doneness. I actually ended up switching the trays on the racks halfway through because the bottom rack was going so much faster. This worked well for me.

I would suggest being careful when spreading the chocolate if you want to make sandwiches. Since the cookies are so lacy/holey, the chocolate leaks through. You just want a thin layer.

Florentine Cookies

2/3 cup unsalted butter

2 cups quick oats
1 cup granulated sugar
2/3 cup  plain (all purpose) flour
1/4 cup dark corn syrup
1/4 cup  whole milk
1 tsp vanilla extract
pinch of salt
1½ cups dark or milk chocolate

Preheat oven to 375 degrees. Line baking sheets with parchment paper.
Melt the butter in a pan or microwave. Remove from heat. Add all ingredients but chocolate and mix thoroughly. Drop dough by teaspoons onto parchment. Slightly flatten them with the spoon. Bake 6-8 minutes until golden brown. Remove from oven and let cool on pan.
Melt chocolate in microwave or on top of a double boiler.
Spread chocolate on the bottom of one cookie and sandwich together to the bottom of another cookie. Or you can just drizzle chocolate along the tops of the individual cookies. Let cool for chocolate to harden. Enjoy!
It's been a month since the NASFT Fancy Food Show and the samples keep on coming. I have really fallen behind on some of products I want to share and in an effort to catch up, I'm blogging about a few today. Some I wish I could give more time and space to, but I've been in the lucky position of being a bit blog swamped.

Tortuga Rum Cakes
When I went to the Fancy Food Show last year I came across one brand of rum cakes. This year I found a new one and made a point to check them out. Any alcohol added to baked goods aids in keeping them moist and gives them more shelf life. That's why I add Kahlua to my brownies. I tried the cakes offered by Tortuga Rum Cakes, which are from the Cayman Islands. They are super moist so that they would leave a sticky rum ring on a piece of paper. As a non-drinker, I'm pretty sensitive to alcohol, even when used in cooking. These cakes definitely had a rum kick to them. But what I particularly liked was the Key Lime flavored cake. Something about the key lime just smoothed and mellowed out the intensity of the rum. Tortuga Rum Cakes makes other things besides the cakes. They also have coffees, fudges, and sauces. I'm sure the rum infused fudge must be pretty good. I liked the sauces. I got to taste their jerk sauce, which had a blended sweeetness with the heat of West Indian spices. They've sent me a bottle of Hell Fire Caribbean Sauce, which I am, quite frankly, nervous to open. Oh, and they gave me some of their coffee, which I gave to Kimberly since I don't drink it. She texted me yesterday asking where I got it, she'd had three cups already that morning. Guess it's pretty good.

Prima Taste Sauces
I also stopped at the Prima Taste booth. They specialize in Asian sauce mixes, particularly from Singapore. I took three packets home to try. The first one is the Black Pepper Sauce that I used with beef. Loved it. You just need to sear the beef cubes and then saute with onions and the sauce with a bit of water added. Being black pepper, it is not really spicy, just peppery. My dad would be a fan of this because he always puts a lot of pepper on his food. The other I liked was the Sweet & Spicy Seafood Sauce. I tossed this with shrimp, onions, and green peppers. These sauces are perfect for when you are lazy and want something good and easy. I'd rather use a sauce pack like these with the meat and veggies of my choice rather than resort to junk food.


Seattle Chocolates' Chick Bars
When I saw these Chick Bars from Seattle Chocolates at the show I wondered what was their purpose? The five are Power, Survivor, Nutty, Extreme, and Strong Chicks. Originally sold as small truffles, the candy bars only just came out last fall. In fact, all of Seattle Chocolates bars had been truffle style with soft centers. The Chick Bars are solid,  dark chocolate. Each has its own personality with the mix-ins. I don't like fruit with my chocolate and so I was wary of the Strong Chick bar with its acai, cranberries, almonds and crunchy edamame. But I was surprised. There wasn't too much sweetness from the berries to bother me and the edamame was just like a peanut. And their purpose? For us to enjoy while celebrating the strength of women every day!


Frosting Queens

Over the three day weekend I decided to get around to using these frosting samples from The Frosting Queens, who happen to be right here in Sacramento and were recently touted by Food and Wine Magazine. I first made cupcakes and topped them with the Crowned Caramel Spice Frosting. It was definitely spiced strongly, but tasted great over my Mexican chocolate cupcakes. These frosting pouches contain one pound of frosting and will keep in your cupboard for up to three months or you can refrigerate them for up to six months. They have no additives or preservatives. Problem is, one pound is not enough to frost a cake. They just covered my 15 cupcakes, but with just my spreading them and not getting all decorative. For a cake you would need two pouches at least. Knowing this, I decided to use the second pouch, the King's Cabernet Chocolate, in some cake balls I posted earlier here. The cabernet is a great flavor component with the chocolate. Mixed in with a chocolate cake fresh from the oven, the cake balls came out fantastic. Their website also offers other uses for the frostings, like using one for the base of a chocolate fondue. Check them out.


Seattle Chocolates Strong Chick Bar, 2.5-Ounce (Pack of 6)
Seattle Chocolates Survivor Chick Bar, 2.5-Ounce (Pack of 6)
Seattle Chocolates Nutty Chick Bar, 2.5-Ounce (Pack of 6)
Seattle Chocolates Extreme Chick Bar, 2.5-Ounce (Pack of 6)
Seattle Chocolates Power Chick Bar, 2.5-Ounce (Pack of 6)
Seattle Chocolates Survivor Chick Bar, 2.5-Ounce (Pack of 6)Seattle Chocolates Survivor Chick Bar, 2.5-Ounce (Pack of 6)
Chicken Tetrazzini

Rating: 4/5

I was reading through some online crockpot recipes recently and stumbled on one where people were writing in the comments, "Why does this recipe call for cooked chicken? The point of using a crockpot is to throw everything in and let the crockpot do the cooking." 

Actually, not so. In fact, the very best braised short ribs or stews always call for searing the meat on the stove first before adding to the crockpot. This important step contributes to depth of flavor for the final dish. But in the case of the above chicken comment, I think the recipe writer was just wanting to use leftover chicken. That's the case with this recipe.


I've made this shortcut chicken tetrazzini recipe since I was a child. It was our after Thanksgiving turkey leftovers recipe. I often just get a rotisserie chicken from the store and use that. The point is, this recipe calls for cooked chicken.

This recipe also calls for a little bit of watching and stirring. So I would not make it expecting to leave it cooking while you are at work. Rather maybe make it on the weekend when you don't want to bother doing a lot of cooking, but you can stir it up a couple of times while it cooks.


Chicken Tetrazzini

1 cup chopped chicken
1 cup shredded cheddar cheese
1 can of cream of chicken or mushroom soup
water
1/2 package of spaghetti noodles
1/3 cup chopped onion

Spray the crockpot with cooking spray. Take the spaghetti noodles and break them into thirds and layer them in the crockpot.

In a medium bowl, mix together the soup with one and a half cans of water (rinsing the can).  Mix in the shredded cheese, onion, and chicken. Pour over the noodles in the crockpot. Cook on low for 4 hours. During the cooking time stir the mixture a couple of times. This will help the cheese to melt into the soup mixture.
Update: If you read my original post below, you'll see that I really thought the cake balls made with boxed cake mix and a tub of frosting were disgustingly sweet. But I also said that I was pretty sure they would taste much better if you at least made your cake from scratch.

Well, it's true. Today I made a chocolate cake from scratch and then used a Cabernet Chocolate Frosting from The Frosting Queens, a local frosting company. These cake balls were sooooo much better!  I could eat see how cake ball addiction could be formed with this batch.  I definitely recommend making cake from scratch since it will be less mushy and sweet than a cake mix.


Original Post 6/30/10:

I had read on another blog about the growing trend of cake balls. Funny how trends can creep up on you. Anyway, it made me curious because, as a cake snob, they really sounded pretty gross to me. But they are so simple that I had to give them a try, say I did them, and unleash them on my always willing coworker tasters.

All you need to do is bake a box of cake mix. While the cake is still warm from the oven, you crumble it into a mixing bowl. Then you add a can of frosting and mix this whole mess together. Now roll small spoonfuls in your hands to make balls. The last step is to dip them in chocolate and then let them sit to harden.

The possibilities are endless. You just mix and match cake flavors and frostings. Then you can roll them in nuts, coconut, candy bits, etc.

I chose yellow cake mix because it was on sale. I added a bit of almond extract to the batter to give it a little nutty flavor. I also chose the cream cheese frosting. You can always make your own frosting as well. Since this was an experiment and I was taking the easiest route to end product, I just bought a can of the stuff, again, on sale.

The only difficulties I had was that the cake balls are pretty soft and so my fork left marks in the ball and chocolate as I dipped them. Then they tended to stick to the wax paper so that when I lifted cooled ones the bottom bit of chocolate would break off. So I ended up with bottomless balls. (Sounds a little kinky.)

Just as I thought, they are pretty sickly sweet and gross. But I can see how they could suit my taste if I just work from scratch and tweak it. The other day I had a rather disappointing cake recipe that was really dense and flavorless due to low amounts of sugar. I could use that cake, basically sugarless, and then use a little bit of homemade icing to "glue" the balls, then dip in chocolate. That would cut down on the sugar overkill of the mix/canned frosting version. I can also see this working really well with a gluten-free cake since they tend to be crumbly. So if you mix the cake with the frosting, you'd get a nice GF cakey treat.

What did the coworkers think?

Rocio said, "Thank you for the treats. They are really good!! I like that the cake balls look like truffles but when you bite into them you get a very moist cake. I don’t know if they are different on the inside, or if they all have the same cake inside, but the one I had was good!. I also like the fact that there’s no mess associated with the frosting. I’m the kind of person that has to wait until a center piece of a cake is available because I don’t like that much frosting. The cake balls get rid of that all together, plus they give the illusion of eating less calories. One or two cake balls seem better than a slice of cake (at least to me it does – but I’m sure its not). I’ve never had one before, but I like the idea, and love the ones you made."

Certainly none of my coworkers ever complain about treats. Not many took the time to comment to me though. Rob ate three of them. Nancy said that she thought they were rich but didn't mind the sweetness. I guess it's just a matter of what kind of a diner you are and what you are used to eating. I'll let you know if I try again with my tweaked, less sugar version.
Have you ever gotten a backhanded compliment? Or one where it's hidden under a disguise of malice or negativity? Sometimes it takes a day or so for you even to find it buried under all the trash.

This week I had two such instances. The first one was an attack on me regarding this blog and my day job. The second was a misunderstanding. Both involved reviewing of restaurants.

I don't want to get into details about the work one. My friends already know the whole story and it might even exacerbate the situation even farther with this post. Suffice it to say, I sort of got in trouble for a restaurant review. But after a couple of days of dealing with it, I realized something. This attacking person apparently thinks I have more reach with this blog than I really do. And that I am going to take as a compliment and just say, boy, I wish that were true.

The greater Sacramento urban/suburban area has a population of about one million people. My total page views of the review on the day in question - 155. Not even a drop in a big barrel.

The thing about blogs is, they are personal online diaries. First and foremost, they are an outlet for the owner. A way to express their feelings and opinions. Because they are on the internet, they are available for others to read. Whether a blog develops a following or is read by anyone else at all... I like to think that I contribute something to Sacramento by having this blog. That's why I have it tied to places like the Bee's SacConnect blogger site and the News10 Community blogger site. I'm trying to reach more people. But my readership is small and I rarely get comments. I guess it's better to get no comments than bad ones. Anyway, my impact is pretty darn negligible.

Many people get to my blog via Urbanspoon.com for my restaurant reviews. Recently I went past my 100th. Before that I had tried to see if I could get one of the better restaurants to comp me to be my big 100th review. I just didn't want to waste #100 on one of my cheap eats. I found out from a friend that some of the restaurants thought I was threatening them. Give me a free meal or I'll write a bad review. Unfortunately they misunderstood. I'm on a tight budget. Some of the restaurants in Sacramento can be over $100 for a meal. I just wanted a way to get to review them for my 100th anniversary review without having to shell out that much money. And if they read my site, they would know that I rarely write a downright bad review. 

As I've explained in past posts, my palate isn't one that can taste every nuance in a dish. My writing skills aren't super descriptive or all that great. They are just passable. In the end, though, I had to take it as another backhanded compliment - that they thought my blog was bigger and more read than it actually is.  Thank you for that. Again, I wish it were so. 

So here I am on my personal blog with my personal thoughts. Will anyone read this? Probably only a handful, if that. But I get to say what I want, how I want, and I'll take any criticism, even negative, as a sign that I might have more reach than I think.
As we are in lemon season I thought I'd repost a couple lemon recipes.

This time around I made lemon souffles. The lemon curd in the bottom of the ramekin is essential for this version. Otherwise the souffle itself is light and boring. I will be trying another version in the future for comparison, since I wasn't too thrilled with this one.

* 3 egg whites
* 5 tablespoons castor sugar or superfine sugar
* 3 egg yolks
* 1 large lemon, zested and juiced
* 2 tablespoons confectioners' sugar for dusting

* lemon curd (see microwave lemon curd)


Preheat the oven to 350 degrees F (175 degrees C).
Spoon a tablespoon or so of lemon curd in the bottom of 4 ramekins.
In a medium glass or metal bowl, whip egg whites with an electric mixer. When they are able to hold a soft peak, sprinkle in 1 tablespoon of the sugar, and continue mixing until stiff. Whisk the remaining 4 tablespoons of sugar into the egg yolks along with the zest and juice of the remaining lemon. Fold a couple of spoonfuls of the egg whites into the yolks to lighten them up, then fold in the rest of the whites. Spoon into the ramekins over the lemon curd, and run a finger around the inside of each rim.
Place the ramekins onto a baking sheet, and place in the preheated oven. Bake for 15 to 17 minutes, until puffed and golden brown. Let cool for about 5 minutes before serving.


I got this recipe on allrecipes.com and it's another 5 star winner. It is SOOOOOOO EAAASSSY and delicious. Nice and smooth and creamy and flavorful. I put some candied peel on top for decoration.

3 cups heavy cream
1 cup white sugar
3 lemons, juiced
1 T lemon zest
3 T additional heavy cream for topping (optional)

In a saucepan, stir together 3 cups of cream and sugar. Bring to a boil, and cook for 2 to 3 minutes. Stir in the lemon juice. Pour into serving glasses, and refrigerate until set, about 5 hours. Pour a little more cream over the tops just before serving.


Lemon

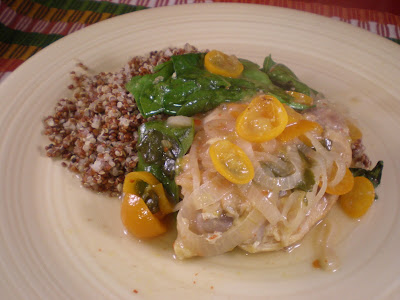
Kumquat Chicken

Rating: 4/5

My BFF has an enormous kumquat tree in her backyard. It is so big that we never get it all picked. I've made marmalade with them and I like to put them into my morning smoothies as well. After all, kumquats have the highest concentration of Vitamin C of any citrus.

Unlike other citrus, kumquats are actually eaten whole. The rind is the sweeter part and the flesh is tart/sour. Therefore, kumquats are prized in China for this flavor contrast. You just need to be careful of the seeds. In fact, the seeds are the most time consuming part about using kumquats since you are slicing and seeding a lot of little kumquats for a recipe.

The original recipe on which this one is based is from Epicurious.com and calls for frying the chicken and then sauteing the rest. I wanted to see if it would work in a crockpot and it did! I like more sauce and so I've upped the amount of kumquats needed to a cup, which is probably about 20 sliced kumquats. I also upped the red pepper flakes because I like some kick, so some people may want to reduce that.


Kumquat Chicken
adapted from Epicurious.com version

•1 cup sliced and seeded kumquats
•1 large shallot, sliced
•3 boneless/skinless chicken breast halves or 4 skinless thighs
•2 tablespoons sugar
•1/3 cup water
•3 tablespoons white-wine vinegar
•1/4 teaspoon dried hot red pepper flakes
•4 cups packed spinach leaves (from about 1 bunch)

Layer shallots and kumquats in the bottom of the crockpot. Place chicken on top. Mix together sugar, water, white wine vinegar, and pepper flakes. Pour over chicken.
Cook on high for 4 hours or low for 6 hours.
Just before serving, gently remove chicken and toss spinach into crockpot. Stir so that the hot liquid will wilt the spinach. Serve chicken, spinach and sauce over rice or quinoa.

Notes:  If you add the spinach too early before serving it will get ugly.
Cooking times may vary depending on your crockpot.
Freshii salad
Freshii - Grand Open 2/14 on Urbanspoon
 
Have you heard about a restaurant that goes the extra mile by not only having biodegradable servingware, but they take going eco-friendly to the extent of low carbon emissions and recycling wherever possible? Better yet is the food - fresh and healthy ingredients.

That restaurant is Freshii. A new franchise which opened its first Sacramento area locations in Folsom and downtown.  Freshii originated in Canada in 2005 and since then has been growing like gang-busters. And why shouldn't it? They are serving real, fresh, food.

Some of Freshii's 70 fresh ingredients

What do I mean by real food? The concept is simple. Fresh, healthy, custom made dishes using whole ingredients like brown rice, chicken breasts, fresh vegetables. You choose what ingredients you want in a bowl, wrap, soup, or salad. You can also order pre-set combos. You won't find frozen, canned, adulterated food at Freshii.


Here is the clipboard you receive when you first walk in. You write your name and choose the ingredients that you want. Most vegetables are unlimited, while premium ingredients, like the proteins, cheeses, and certain fruits, have per ingredient costs. You can choose your dressing/sauce by calorie level and whether you want half, whole, double serving sizes. What's really awesome is that if you go to their website and enter in the ingredients, it will calculate the nutritional values for you. So you see the calorie, carbs, fiber, and fat content right away. Give it a try here.

Freshii Warrior Chicken Bowl
 
I chose to do a pre-set selection called the Warrior Chicken Bowl. It had Cajun chicken, corn, black beans, onions, cilantro, and some other things mixed with brown rice.  Poor Girl Kimberly ordered the Bliss Bowl with goat cheese, avocado, tomatoes, and more mixed with brown rice and with a balsamic dressing. You can choose to do noodle bowls instead of rice.

Here is a video where the company founder explains the process.


If you like soups, they have three broths: vegetable, chicken, or spicy lemongrass. When you select the vegetables you want in your soup, they quickly parboil them and then add them to the prepared broth. That way you don't have overcooked veggies in a soup that's been sitting around.  Each soup is freshly made for each person.

Freshii yogurt
Freshii is open for breakfast with oatmeal, muesli, and breakfast wraps. They also have frozen yogurt and toppings.

The stores themselves are eco-friendly. They have low carbon footprints because they do not use dishwashers, grills, or ovens. They clean with natural, biodegradable cleaners. They recycle as much as possible. If you are really into being green yourself, you can even bring in your own bowl which they will wash and then use to serve your food in.

You see above that my bowl was actually served in a to-go box. They don't mess around with unnecessary plates that will immediately go into the trash and then you want a to-go box for your leftovers. Instead, you eat out of the box and if you can't finish it, you seal it up and off you go. All of there servingware is biodegradable. The silverware is made from potato and corn starches. These implements have been around for years and I've always wondered why restaurants won't use them. The answer usually is "they are too expensive". Well Freshii proves you can use them and not inflate the prices of the food.

Kimberly and I are excited that there is such a healthy, fast alternative out there now. It is possible to eat that way while dining out. Since we live downtown, we can't wait for the second location.

The downtown location opens at 3rd and Q on Monday, April 11th. Since it is owned by Yogurtagogo's Eric Heffel, it will have a self serve yogurt section with six flavors. It will also be getting a beer and wine license. Heffel plans on having music and other events on nights and weekends.


The Beacon Bar and Grill (Camp Richardson) on Urbanspoon

I took my friend, Michelle, to Lake Tahoe for her first visit. It was a gorgeous, sunny winter day. We toured the lake area and she took pictures to share on Facebook with her friends back east. She wanted to have lunch either on the lake or with a nice lake view. I didn't know where to go since I just knew the casinos and my favorite pizza joint (Blue Dog Pizza) and so we asked a guy in a tourist shop for a suggestion. He told us to go to the Beacon at Camp Richardson. 

All these years that I have visited Lake Tahoe I had heard about Camp Richardson but never been there. I know it mostly as a family camp ground/resort. Considering that it's been there since the early 20th century, I'm sure the restaurant's quality has gone through different cycles of bad to mediocre to good. Happily it currently falls under 'good', or at least, it was for our visit.

Most of the Yelp comments center on the Rum Runners, making it obvious that the place is a favorite for carousing during summer vacation after a day on the beach. After all, the Beacon is right on the shore, not 50 yards from the water. And although Michelle did have two of them, my concern is always the food.

Beacon Bar & Grill: Korean short ribs

We both had a couple of items on the menu that we were interested in. One we shared was the short ribs done with a Korean style teriyaki and served with rice and bok choy. Out came out a generous plate with about 10 short rib pieces sticky with teriyaki sauce. What impressed me was that these were not skimpy, thin slices but slices about 1/3 of an inch thick. I guess I've become too accustom to the thin ones at the Hawaiian BBQ on my corner. These were meaty and tasty. The bok choy was cooked correctly with a nice soy glaze on it. 

Beacon Bar & Grill: Steamed clams

I had opted for the steamed clams in white wine garlic sauce. I got a large bowl full of sweet, baby clams. There was plenty of broth that was filled with minced garlic, sliced onion, and lots of white wine and butter. It was served with French bread fresh from the oven to sop up the abundance of broth. It was good, although a tad on the briny side. But with all that garlic, who cares? Yum.

Service was a bit slow, but we were relaxing and enjoying the view anyway. In the end, we were happy with the suggestion and I'll be happy to take other virgin Tahoe visitors there again.


Part 1: Selecting the Clinic & Pre-op Appointment


Liposuction History


Dr. Giorgio Fischer, a gynecologist from Rome, Italy, invented the liposuction procedure in 1974. Dr. Illouz, a French plastic surgeon, made the first purely cosmetic use of the procedure four years later. During these early years, lipo was done with thicker tubes using the dry method. That meant that a person was under general anesthetic and they vacuumed out the fat by thrusting and sucking, a rather harsh method.


Dermatologists Dr. Jeffrey Klein and Dr. Patrick Lillis invented the tumescent technique of liposuction in 1985. In this technique "a solution composed of lidocaine (a local anesthetic similar in its numbing effects to novocaine), saline, and epinephrine (a drug that constricts blood vessels and thus reduces bleeding during surgery)" is pumped under the skin. The added fluid in the area makes it easier to maneuver. The patient is awake with this local anesthetic and is able to do this as an out-patient procedure.


In 2006 the technique become even less invasive with the approval for the use of lasers. Now cannulas that were once several mm in size are down the size of a strand of spaghetti. The procedure can be done through small port holes punched into the skin - about the size of a cocktail straw.


The Day is Here


Was I excited? No. Nervous? A little bit, but not too much. My appointment wasn't until 3 p.m. and so I went to work. 

Michelle picked me up at 2 and we headed out to the Physician Skin and Weight's  (PSWC) Roseville surgery center. I had been told the procedure would take about 3-4 hours and Michelle could either go shopping or go to a movie. She opted for shopping and took off.

I was met by Vanessa, a nurse aide who was going to be with me for the afternoon. She had me strip for some more 'before' pictures and more measurements. Then it was time to meet Dr. Menon.

Dr. Shailaja Menon is actually the owner of PSWC. She started the business over seven years ago doing mostly work with skin, things like botox, restalyne, microdermabrasions, etc. Then when laser lipo (also known as SmartLipo) was finally perfected and released in 2006, she immediately trained on it so she could add it to her practice. Since that time laser lipo has become about 90% of their business. There are offices in Folsom and Roseville and she's been able to open a second surgery center in San Jose and is currently looking for a suitable location to add another in the San Joaquin valley. Currently there are six doctors, including herself. An important detail - she's had the procedure done on herself!

They had me take Vicodin and Ativan while I asked her some more questions, like the nature of fat. She explained that we are all born with X number of fat cells in our bodies. You don't get more, they don't regenerate. All fat does is inflate and deflate as needed. Each person is different due to genetics - where the fat sits in the body, their metabolism, hormones - all are factors to how fat appears on us. So I asked her about the size of fat cells on severely overweight people, like 700 lbs. Menon explained that they were probably the size of raisins.

Needle that irrigates with saline/lidocaine mixture

I asked her how much is the most they could take out. After all, I couldn't imagine taking out 100+ pounds of fat from a person. She explained that there is a law and standard that only 5 liters at a time can be removed. She politely explained that this isn't a method for weight loss. What they do is provide body sculpting and contouring. Therefore, they do work closely with clients to discuss realistic outcomes. For instance, some people might ask for something that their body frame just won't pull off. If they are big boned and have a wide skeleton, they'll never have narrow hips - you can't change bone structure. 

She then proceeded to mark my torso with a marker. She indicated where the 7 port holes would be placed. Two would be visible under my chest, but the other 5 would be down at my bikini line. I was the laid on the table to wait. 

The procedure

Punch tool for making port holes
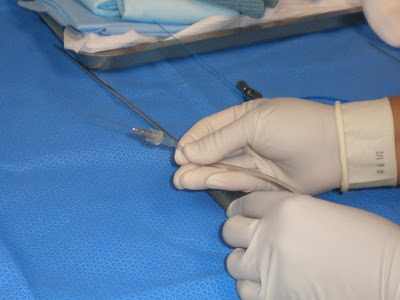
The first part of the procedure was to numb the port hole areas for puncture. I was expecting a harsh needle, like a shot, but was happy that they were more akin to pin pricks. The needle is actually attached to a tube that leads to liters of a saline and lidocaine, which is the numbing agent. Dr. Menon was then able to punch the holes, slightly smaller than a straw.

Next was the injection of the saline. I was inflated like a water balloon with the lidocaine saline solution. This solution numbs up your insides in preparation for the laser and vacuuming. But when you add a couple of liters under your skin that's not used to it, it's stretched very tight. Plus the saline is heavy, so you have the sensation of bricks being loaded on your torso. 

The laser tip comes out of the end of the tube.

Finally it was laser time. The laser itself is on the tip of a thin strand, the size of angel hair pasta. It's super thin. Dr. Menon inserted it into one of the ports and began stroking back and forth with it as the laser blasted the fat cells. I could feel the wand scrape my insides. It didn't hurt except for an occasional jab. I asked her what protected my organs. She explained that it was my abdominal muscles, which are about an inch thick. That after the first couple of strokes, the muscles reflexively tighten up as a self defense mechanism. I was feeling the strokes along the muscles and along the inside of my epidermis (skin). It didn't hurt, I just knew it was happening.

She continued with each section. She had marked 8 sections on me and it took about an hour for that part alone.


NOT a smoothie, some of my fat.
After she was satisfied that she had 'melted' the fat, it was time to suction it out. She switched to the vacuum cannula to once again work each section. This step was a bit more aggressive in the strokes and the jabs, but nothing unbearable.


Interestingly, I was lucid and alert during the whole procedure. The drugs are supposed to be for pain and to calm you down. For some people, they get really loopy. Some people fall asleep. I was alert and paid attention during the whole thing. It wasn't until we were done and I had to stand up that I got a little dizzy.


Finally she was done and Vanessa helped to clean me up. Expect a lot of liquid since there is a lot of the saline solution involved. I used 6 liters of it! This was partly due to my apparent dehydration. Dr. Menon said she could tell I was dehydrated because my body just sucked up the saline.


Vanessa stood me and massaged my body to get some more of the saline to come out of my port holes before dressing me. They aren't able to suck it all out and so it will either drain through the port holes over the next 24 or so hours or it will be reabsorbed into the body and disposed of through your urine.


The port holes were dabbed with antibiotic and then I was taped up with feminine pads over the holes to soak up the drainage. Finally, the compression bandage garment was wrapped and strapped around me. A giant girdle to hold you in tight while your body heals. You are required to wear it 22 hours a day for the first two weeks and then 12 hours a day a month after that. You can also wear Spanx.


Michelle was there to drive me home except that you are required to be with someone for 24 hours just to be sure you don't have any problems. I spent the night over at BFF's house. I took a shower and rebandaged up. Then I took another Vicodin to sleep through the night. It was just a bit uncomfortable with all the padding and the compression garment.


I felt fine the next day. I drove to the first follow-up so that Ranee could check my port holes and to make sure I was wearing the compression garment properly. I was now able to take Tylenol instead for the pain. Basically my holes were itchy and my midsection was just really sore. I was still draining out of the lower holes (gravity), but the upper ones were already closing and healing.


I wore the compression garment and padding through a second night. The next morning I was able to just put small gauze pads on the last three holes that hadn't stopped draining completely and then switch to wearing Spanx. Then I went about my day as normal. I didn't even necessarily need Tylenol anymore. It's just soreness.


What Next


My next follow-up is in a month. By then my swelling should be down and I'll have my first set of after pictures. Perhaps I'll share some body pictures at that time (but that's not a promise). Then I think the final follow-up will be at the 6 month mark. But I should be 'done' any time from 4-6 months, depending on my body. Stay tuned!


Part III: 5 Weeks Out 
Part IV: 4 Months Out
V - Final Appointment


FCC Disclaimer: I was provided a substantial discount on the procedure in exchange for this series of articles. 
I remember about 20 years ago when my then mother-in-law got liposuction done. I was in my late 20's myself and she was about the age I am now, in her 40's. I remember questioning her on why she wanted to get it done. After all, she wasn't fat. Sure she might have had a few extra pounds, but not worth going to get lipo done!

Now I find myself in her shoes. I look in the mirror and see the extra pounds that have collected around my midsection. Wearing certain clothes is no longer an option without the strongest set of Spanx possible to hold it all in. And Spanx, God love 'em, isn't a complete miracle. You can still ooze out of the top/bottom.

So I started the new year with wondering about the new laser lipo. I have a reunion Memorial Day weekend and figured I needed to look into it soon if I was going to be ready in time. (For more on my reasons, read this post.)

Shopping Around

I decided I would check out the two top clinics in Sacramento that offer it. I kept in mind that I was not going to get pressured into anything. After all, they will push for the sale like a car salesman by creating that sense of urgency - You need to sign up now because this price is only good for this month!

Clinic #1 was nice enough. I went to talk to the consultant about how the procedure takes place, what I can expect, etc. She had me lift my shirt and lower my jeans so she could look at what I needed done.

These clinics parcel off the human body like a beef-on-the-cow diagram. Here I am thinking that I just needed my abdomen done. Nope. It's considered four areas: upper abs, lower abs, waist, and hips. At this place it is about $1k per area, add the other fees, and I'm up to about $5k. They do offer a 12-month, 0% financing plan.

Clinic #2 was Physician's Skin and Weight Centers (PSWC). The visit started off the same way with my consultant, Lindsay. But there were differences that I noticed right away. First of all, Lindsay explained that I would be required to get a series of blood tests before my pre-op appointment. If the blood tests indicated any reason I should not be allowed to have the surgery, the contract would be canceled with no cost to me. I appreciated this thoroughness. It gave me a sense of comfort that they were taking the extra steps to look out for my welfare.

Second, Lindsay had had the procedure herself. She was personal testimony in the flesh, showing me the small port holes on herself and her before/after pictures. It is one thing to read testimonials in marketing materials and another to talk to someone in person. She was able to answer all questions. She was also so friendly and pleasant that I felt like I was talking to a girlfriend rather than a salesperson.

PSWC had a different chart and according to their system, I had three sections to work on. But they were more expensive by quite a bit. They do offer an 18-month, 0% financing plan though - extra Brownie points.

I weighed the two clinics in my mind and in the end decided that PSWC might cost more, but I felt much more comfortable with them. I liked the extra steps of having my blood tested, the pre-op appointment, and the 18-month financing plan. I also liked Lindsay and having talked to her about her own experience.

The Pre-op Appointment

Lindsay gave me a lab order with the blood tests I would need checked off. She explained that I could either go to an independent lab or try to get my health plan to do it. I was able to get my primary care doctor to order the labs and went in at no cost to me. If you go to an independent lab, expect to pay about $100. In the end I had about 20 pages of results since my lab prints out each result on a separate page. Nice thorough blood work!

I arrived at my pre-op with lab results in hand. Ranee was my nurse practitioner who met with me for an hour. She took the standard measurements of weight, body fat, temperature, and blood pressure. Then she did an EKG on me to measure my heart rate. Another detail that I appreciated. This gave me another sense of thoroughness.

Ranee then went over all the releases I needed to sign. These included being explained the procedure, the dangers, what I needed to do before and after, etc.

I left feeling nervous and a bit excited. Really my nerves are more about these posts because I'm exposing myself to the world here. Most people would do this quietly and only tell their few closest friends. Me, I'm writing about it and EVERYONE will know.


FCC Disclaimer: I was provided a substantial discount on the procedure in exchange for this series of articles.
I know what vanity is, but for the sake of this post I wanted the true definition, which is: "Excessive pride in one's appearance or accomplishments; conceit". Therefore, I would not consider myself to be an example of it. After all, I often go to the grocery or drug store sans shower, makeup and in sweats. Hell, I've even gone in my scrubs that I wore as pajamas and was to lazy to change out of. This compared to some of my friends who won't leave the house without full makeup.

I realized that what I'm getting done is not due to vanity, it is due to self image or self perception.  You see, starting tomorrow and over the next couple of months, you will be reading about my getting laser liposuction done.

Yikes! My ears are ringing! I'm hearing all the people who have met me saying out loud, "What the hell? She doesn't need lipo!" But that's where self image comes in. You do these things for yourself, not for everyone else.

I'll get into my why and how shortly. First I want to discuss that issue of self-image. How do you see yourself? The anorexic or bulemic sees themselves as too fat when they look in the mirror. The rest of us see skin and bones. A person sees their own big nose, yet I find it's what gives you character and makes you attractive.

There's also those with misconceived ideas of physical attributes. Mainly, big breasts will make me more attractive to men. We all realize that all they do is increase lust, not attraction. Getting to know you as a person is what will make you attrative or not. If you're a bitch, triple D's aren't going to help you.

It's what you see in the mirror and how you feel about yourself that matters. If you don't like what you see, you can make yourself miserable.

I'll admit that when I look into the mirror I am pretty damn pleased with what God (and mom and dad) gave me. And that last sentence is admittedly vain. I'm thankful that I got my mom's Filipino tanning skin versus my dad's British burning skin. That my mom's flat nose was countered by my dad's bigger nose to give me the right sized nose.

So why the lipo? Because I grew up well into my 20's thin. Like this. And even though I understand that age means added weight, I'm not happy that it all goes to my middle. You see, it's true - women become like their mothers. My mother was small as can be and yet she had a Buddha belly. All her added weight went to her round, little belly. So while you look at me and see thin extremities, you don't see that most of my weight is in my midsection. I've hid it well or covered it in Spanx.

I do exercise. I go to spin class at least three times a week and do weights the same. But as much as you tone up your muscles, the fat is still there.

It's funny what you remember from school. I vividly remember the day Ms. Zimmer explained in biology class that a fat cell never disappears. It only inflates and deflates. I'm getting rid of those fat cells the only guaranteed way there is - removing them.

As to the how? My first article tomorrow will go into why I chose the clinic I did and the pre-op stuff. But I must issue the required FCC disclaimer and explain to you that I asked them if they would give me a deal in exchange for my detailed blog accounts. Much to my shock, they agreed. I really didn't think they would and so when they agreed it became a case of - you can't pass this once in a lifetime opportunity up! They get some publicity, which they are free to use in their own marketing campaigns, while I get a super deal. The only catch for me - it's public! You all know about it! Yikes!

So that's it. You'll be reading about how I chose them, the pre-op appointment, the surgery day itself, the recovery, the follow-up appointments, and the final results. I just ask that you read them as informative articles and don't embarass me too much when you see me next.
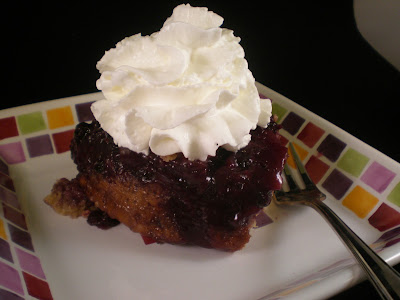
Crockpot Berry Cobbler

As I do these Crockpot Wednesdays I've been amazed by the fact that you can bake in them. If I had known that in college, I would have had a crockpot back then. Keep that in mind, parents, when sending your kids off - crockpots are very versatile.

But although you can accomplish this feat, it's not exactly pretty. It's a means to an end, just not a pretty one. The gist is, you can bake any cake you normally do in a crockpot, but don't let anybody see it. Serve it out on a plate and add some whipped or ice cream to hide its imperfections. It will taste just fine.

This week I decided to do a dessert. BFF wanted me to bring a dessert to the Superbowl party and so I figured a berry cobbler would be nice. After all, I still had about two pounds of berries from berry picking last summer. You can do any fruit you like, of course, it's just a matter of changing the bottom fruit layer.  I will tell you that I found that this recipe had too much dough. Next time I will only put about 2/3 of the dough in or add a bunch more fruit.

Berry Cobbler

1 lb of berries
1/2 c sugar
2 T quick cooking tapioca
1 1/2 c flour
1/2 c light brown sugar
2 t baking powder
1/4 t cinnamon
1/4 t nutmeg
3/4 c milk
1/3 c butter, melted

Prepare the crockpot with non-stick cooking spray. Stir together the berries, tapioca and sugar. Put in the bottom of the crockpot.

Mix together the rest of the dry ingredients. Add the milk and butter and mix until just blended. Spoon dough over berries. Cover and cook on low for 3-4 hours. Uncover and let cool before serving. Serve with ice cream.

Note: Cooking times may vary depending on your crockpot.